We make software for humans. Custom Mac, Windows, iOS and Android solutions in HyperCard, MetaCard, and RunRev LiveCode
Resources...
Converting a HyperCard stack to LiveCode
Make the Index into a floating palette
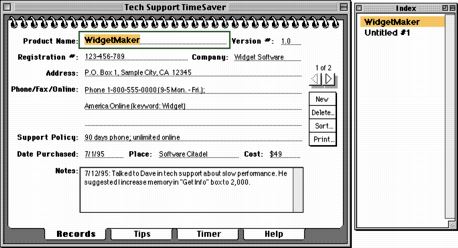
The Index menu works fairly well if there are only a few cards in the stack, but it can quickly become too long to be navigated easily. An easier user interface for a long list of choices is a clickable list. In order to make the Index accessible from any card, we'll make it into a floating palette.By now you should be able to create and edit a new substack without much trouble. Create a new substack with "Index" as both its name and label. Resize the stack so that it is longer than it is wide -- how high you make it is up to you, but it should be long enough to display at least ten or fifteen names in a scrolling field.
![]() Create a new scrolling field by choosing the Tools Palette from the Tools menu, clicking on the scrolling field tool, and dragging out a field that covers most of the area on the new card. Double-click the field with the edit tool to name it "Product List". Just for the effect, uncheck the Opaque and Show Borders checkboxes so that the body of the field will be transparent. Use the Text menu to set the field's font to Helvetica, the text style to Bold, and the text size to 12. Click the Field tab in the Properties palette and make sure the text is locked and the "Can receive keyboard focus" checkbox is checked. Close the properties dialog.
Create a new scrolling field by choosing the Tools Palette from the Tools menu, clicking on the scrolling field tool, and dragging out a field that covers most of the area on the new card. Double-click the field with the edit tool to name it "Product List". Just for the effect, uncheck the Opaque and Show Borders checkboxes so that the body of the field will be transparent. Use the Text menu to set the field's font to Helvetica, the text style to Bold, and the text size to 12. Click the Field tab in the Properties palette and make sure the text is locked and the "Can receive keyboard focus" checkbox is checked. Close the properties dialog.
Open the script of the field. We will use the functionality of the menu script we wrote before, but change it slightly to work from a substack. The primary change we need to make is to provide a full identifier for the card we want to go to in the Records background. Because the script will look for the background in the current Index stack unless specified otherwise, we need to add the full reference to the card. Put this into the script of the field:
Save the field script and open the script of the Index stack.on mouseUp get the clicktext go cd lineOffset(it,me) of bg "records" of stack (the mainstack of this stack) end mouseUp
We will insert an openStack handler that will not only block the one in the main stack from executing, but will also update the index listing when the Index stack opens. Set the script of the Index stack to this:
Save the Index stack to disk.on openStack makeIndexMenu end openStack
Revise the makeIndexMenu handler
Though we aren't going to change the name of the handler, the script will no longer place the Index in the menu. Instead, it will place the listing in the field on the Index palette stack.
Bring the main stack to the front and open the stack script. We need to change the line that places the index into the menu, and we need to expand the reference for the Records background, since another stack will be calling this handler. Make the changes to the makeIndexMenu script as indicated in red:
on makeIndexMenu -- updates Index menu
  global gNumUntitled
  put "1" into gNumUntitled
  repeat with i=1 to the number of cards of bg "Records" of me
    set cursor to busy
    get line 1 of bg field "Product Name" of card i of bg "Records" of me
    if it is not empty then
      put it & return after theIndexList
    else
      put "Untitled #" & gNumUntitled & return after theIndexList
      add "1" to gNumUntitled
    end if
  end repeat
  put theIndexList into fld "product list" of cd 1 of stack "index"
end makeIndexMenu
The Index menu is no longer necessary, though we do need a menu item that will display the new Index palette on demand. The standard rule is that a menu must have at least two menu items; if there is only one menu item then it should be placed into another existing menu instead. It is up to you whether you think the Show Index menu item should go in the File or Edit menu, but this tutorial will put it at the end of the Edit menu.
Open the menu group in the Menu Builder. In the Edit menu, add a hyphen and a "Show Index" line at the bottom of the menu item list so it looks like this:
Open the script of the Edit button and add a case statement to the menuPick handler that deals with the Index stack:Undo/Z - Cu&t/X &Copy/C &Paste/V - Show &Index/I
on menuPick which
  switch which
  case "Undo"
    undo
    break
  case "Cut"
    cut
    break
  case "Copy"
    copy
    break
  case "Paste"
    paste
    break
  case "Show Index"
    palette "Index"
    break
  end switch
end menuPick
Save the script and try out the Show Index item.
Now that we have an Index palette, there is no need to keep the Index menu button. Delete it from the stack. You can do that by going selecting the button with the edit tool and hitting the Delete key on your keyboard. Save the stack to disk and try it out.
Optional exercise: Add a preOpenStack handler to the Index stack that will position the Index next to the main stack when it opens.