|
Table of Contents(Partial listing:)
|
Notes about menus
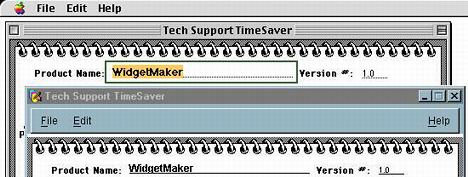
On a Macintosh, if a menu group is not placed on a card, no stack menus appear in the Mac menu bar while that card is current. (There is one exception. It is possible to assign a default menu bar that appears when no other menu group is available. The default menu bar is only effective on Macs; if run on Windows, the stack will not have a menu on that card.) If a stack with no menus is run in development mode, MetaCard's developer menus will appear instead. If the stack does have a menu, then its own menus will replace the developer menus. In developer mode, the MetaCard menus can be accessed by bringing the message box, Home stack, or other native MetaCard stack to the front. There are other ways too, such as showing MetaCard's menus in a floating palette. If a stack with no menus is run in player mode, the Mac menu bar will be empty except for the Apple and Help system menus. On Windows machines, none of the above applies since there is no central menu bar. A card either has a menu or it doesn't. MetaCard's developer menus are displayed in a palette off to one side. In MetaCard, double-clicking on a stack to launch MetaCard will launch the stack in player mode on any platform. There will be no menus unless the current card of the stack contains a menu group. If you should find yourself in the situation where you've double-clicked a stack without a menu bar, you can use the stack's close box to quit the program, since MetaCard automatically quits when the last stack is closed. But if your stack is in a window without a close box, you may have to force-quit. MetaCard menus are objects that take up room at the top of a card. On Windows, this is standard; menus appear at the top of each window. When the same stack is run on a Macintosh, MetaCard pushes the top portion of the card above the top border of the window, out of view. The body of the window shortens to accomodate only that portion of the card that contains the actual stack content. The card is still technically the same height, but the part of the height that contains the menu group is hidden from view. MetaCard handles this window resizing transparently between platforms. One thing for HyperCard users to remember is that what appears to be coordinates "0,0" on a Mac screen will really be more like "0,38", because the first 38 pixels contain the menu group hidden under the top of the window. Any scripts that work with card coordinates need to account for that.
When to create menusWhen you are building stacks from scratch, the best time to create the menu bar is first. Because menus take up space at the top of the card, at least a basic group should be created before anything else. If the menu group isn't there from the beginning, you'll probably have to move all other card objects downward eventually to accomodate one later. Unless you plan to run the stack entirely in development mode at all times, you will need at least the basic File and Edit menus anyway.Things change when you are converting HyperCard stacks to MetaCard, because the card objects are already placed and there is no room for an extra group of menu buttons at the top of the card. In most cases, the card must be made taller to accomodate a menu group, and all the existing objects need to be moved down to a lower portion of the card underneath it. This can be done with a script, and we'll walk through it in the next step of the tutorial.
MetaCard offers a global property called selectGroupedControls, which by default is false. You can set it to true in the message box (Runtime Revolution offers a clickable setting to toggle this property.) If selectGroupedControls is true, then you can edit objects in a group without going into background mode. Clicking on an object while selectGroupedControls is true will select the object itself rather than the group containing it. Because this tutorial is for HyperCard users who are used to editing in background mode, we will usually suggest that method -- but feel free to try selectGroupedControls too, which is much easier most of the time. Getting into background mode: If you do not need to adjust the physical size or position of background objects, it is often easier to access their properties by using the Control Browser under the Tools menu. If you do want to get into background editing mode: choose "Backgrounds..." from the Edit menu, select the group you want to edit, and click "Edit". To leave background editing mode, choose "Stop Editing BG" from the Edit menu.
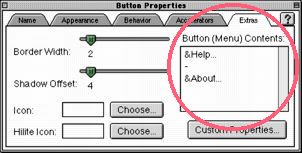
The last item in the Help menu must be the "About" item, and the item before that one must be a divider line (indicated by a hyphen in the button contents.) If this convention is followed, MetaCard will automatically place the About menu item into the first position in the Apple menu on Macintosh computers; it leaves it in its normal position under the Help menu on Windows. MetaCard handles this cross-platform issue for you. Any menu bar created by the Menu Builder tool will create these items in the proper position by default. All you need to do is add the appropriate scripts, which this tutorial will show you how to do.
Keep these symbols in mind when creating and editing menu items in the next section of the tutorial, for you will see them in the Menu Builder tool we will use.
|
![]()
![]()

All contents copyright (C) 1996, HyperActive Software. All rights reserved.
Revised: December 3, 2001
URL: http://www.hyperactivesw.com/mctutorial/tutorialtoc.html